20-Minute Yoga Flow to Help You Slow Down

The following sequence of poses is designed to be practiced with one movement per breath although to slow it down even more, you can stay for as many breaths as you would like in each pose. There are no props required in your 20-minute yoga flow although you’re welcome to use whatever helps you feel more comfortable.
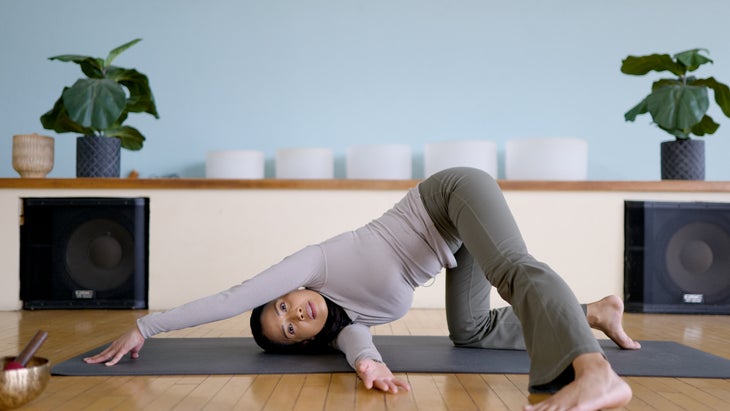
Child’s Pose
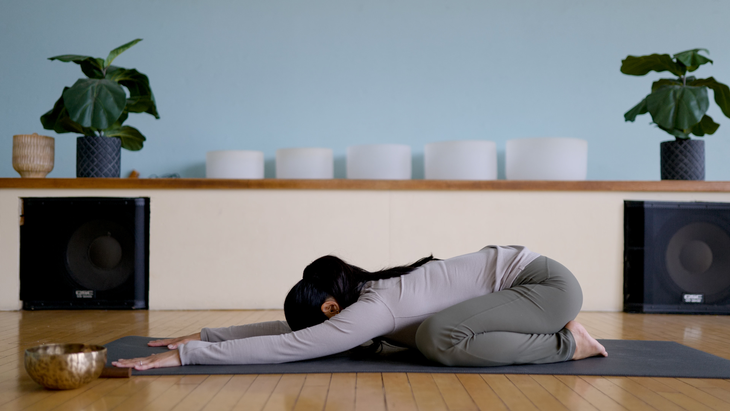
Child’s Pose (Balasana) with Ujjayi Breath
Start by coming onto your hands and knees in a tabletop position. Align your wrists directly beneath your shoulders and your knees beneath your hips. Once you’re in this position, take your knees wide apart to create space for your torso, and begin to slowly sit back toward your heels. Allow your arms to extend forward along the mat, keeping your palms facing down, and let your forehead gently rest on the floor. This is Child’s Pose (Balasana).
As you settle into the pose, begin by focusing on your breath. Inhale deeply as you extend your fingertips toward the top of the mat, reaching and lengthening your arms. Feel the stretch along your sides and the space you’re creating in your body. Exhale slowly, allowing your chest and torso to melt closer to the floor, deepening the stretch and sinking your hips back toward your heels. With each exhale, feel yourself becoming more grounded and relaxed.
To add a sense of focus and deepen your practice, begin to constrict the back of your throat gently as you breathe, creating the Ujjayi breath. This breath creates a soft, oceanic sound that can help you tune into your practice and stay present. As you breathe in and out through your nose, imagine the sound of the breath like the waves of the ocean—gentle and continuous. The sound of your breath can serve as a calming anchor, allowing you to center your mind and focus on the moment.
Stay in Child’s Pose for five full breath cycles, or as long as it feels comfortable. With each breath, feel your body softening, your mind calming, and your spirit grounding deeper into the mat. Use this time to find stillness, reconnect with your breath, and center yourself in the present. This pose offers a peaceful pause and an opportunity for introspection, so take your time, and let the calming effects of the Ujjayi breath guide you.
When you’re ready to come out of the pose, gently begin to bring your hands back toward your torso and slowly rise up, coming back into tabletop position. Take a moment to feel the effects of the practice in your body, noticing how calm and centered you feel after holding this grounding posture.
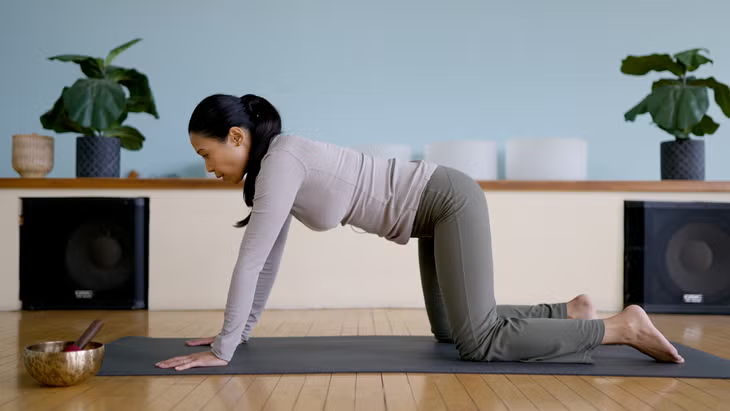
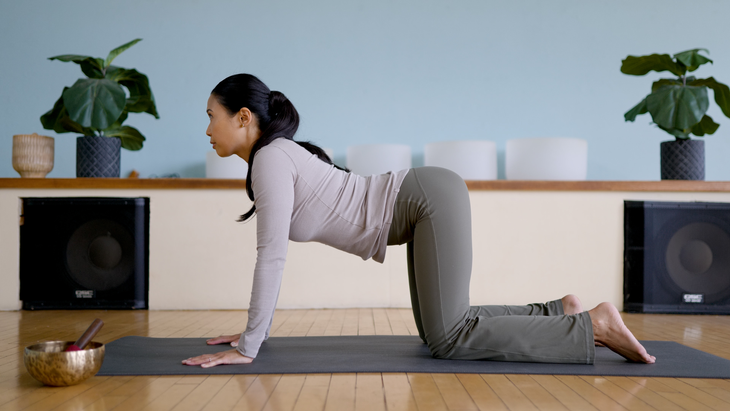
Cat – Cow
From Child’s Pose, rock forward to your hands and knees in Tabletop.
Inhale as you tilt your pelvis, roll your shoulders down and away from your ears, and arch your back in Cow (Bitilasana).
Start in tabletop position, with your hands aligned directly beneath your shoulders and your knees directly beneath your hips. Begin by grounding through your palms and the tops of your feet. As you inhale, allow your belly to lower towards the mat, lifting your chest and tailbone toward the sky. This is Cow Pose (Bitilasana), where you feel an opening in your heart and a gentle curve in your spine, bringing mobility to your back and stretching through your chest.
Now, exhale deeply as you tuck your tailbone under and round your spine upwards towards the ceiling, engaging your core and drawing your chin toward your chest. This is Cat Pose (Marjaryasana). Feel the stretch along your back and the activation in your abdomen. Draw your shoulder blades apart and allow your body to move with the flow of your breath. Continue this movement, inhaling into Cow Pose and exhaling into Cat Pose for 3 full rounds, moving fluidly and with control.
Once you’ve completed your 3 rounds, come back to a neutral position with your spine aligned in a neutral tabletop. From here, start to bring your attention to your hips. Begin by making slow, controlled circles with your hips, moving in a clockwise direction. Let your movement be fluid and intentional, making your hips trace wide, circular motions in the air. As your hips move, allow your shoulders to join in by making small circular motions in the same direction. As you circle, you’re creating a flowing figure 8 with your body, where the bottom part of the 8 is traced by your hips and the top by your shoulders.
Take a moment to close your eyes if that feels comfortable. Closing your eyes can help you focus more deeply on the sensations in your body, connecting your mind and body in a more intimate way. Feel the sensation of your spine moving and your joints releasing tension as you fluidly move through these circles. Continue making these circular movements for at least 20 to 30 seconds, allowing the body to unwind, release any stiffness, and foster a sense of freedom and flow.
Once you’ve spent a few rounds moving clockwise, gradually begin to reverse your circles, moving your hips in a counterclockwise direction. Keep your movements slow and controlled, allowing the fluidity of the circles to bring balance and symmetry to your body. Repeat for another 20 to 30 seconds, making sure to keep your movements full and expressive, allowing your body to move freely within your comfort range.
After completing both directions, come back to a neutral tabletop position. Take a deep breath and notice how your body feels—more open, relaxed, and connected to the present moment. This flow of movement and breath is not only a way to release tension but also a reminder to stay present and aware in your practice.
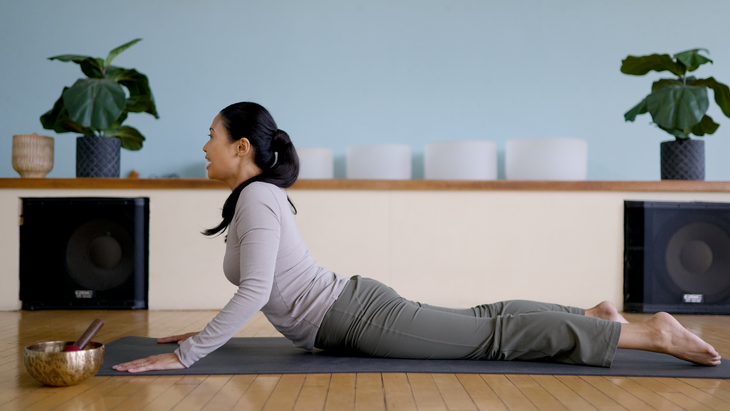
Cobra Pose (Bhujangasana) with Flowing Movements
Begin by coming to a comfortable lying position on your stomach, with your legs extended behind you and your feet hip-width apart. Gently place your hands about 5 inches closer to the top of the mat, just beneath your shoulders, with your fingers spread wide for stability. Ensure that your elbows are tucked in toward your ribs and that your body is in a relaxed, neutral position.
From here, take a moment to ground yourself on the mat and prepare for the movement. Inhale deeply, and as you do, shift your hips slightly forward to bring your pelvis in contact with the mat. Hug your elbows in toward your torso and engage your core as you slowly lower yourself down, allowing your chest and belly to come to the floor.
With your fingertips directly beneath your shoulders, inhale again and begin pressing down into your palms to lift your chest off the mat. Cobra Pose (Bhujangasana) should feel gentle and opening, with your back muscles doing most of the work rather than relying on your arms. As your chest lifts, draw your shoulder blades gently back, opening your heart and allowing your spine to extend in a mild backbend. Your elbows remain slightly bent, and your gaze is forward or slightly upward, depending on your comfort level. Stay here for a couple of rounds of breath, feeling the expansion in your chest and the lengthening of your spine.
On your next exhale, slowly lower your chest and abdomen back down to the mat. Stack your hands on top of one another, resting your forehead on your stacked hands. Take a moment to release any built-up tension in your lower back and hips. Sway your hips gently from side to side, massaging your lower back and letting go of any tightness. This gentle rocking motion helps to ease out tension and bring awareness to your body’s sensations.
When you’re ready to move again, place your fingertips back under your shoulders, engage your core, and inhale deeply to lift your chest again. This time, if you’re feeling ready, you can straighten your arms for a deeper stretch and more intense backbend. As you straighten your arms, ensure your legs and hips remain grounded to the mat for stability. The more you extend through the chest and lengthen the spine, the deeper the stretch will be, but keep the movement controlled and mindful. Hold here for a few breaths, feeling the openness in your chest and the stretch along your back.
As you exhale, slowly lower yourself back down to the mat with control. Rest again by stacking your hands and bringing your forehead to the top of them. Take a few moments to rest and reflect on the opening you’ve created in your body. Let your breath return to its natural rhythm as you feel the softness of the mat beneath you, and allow the sensations in your back and chest to settle.
Take this practice at your own pace, and remember that Cobra Pose can vary depending on how your body feels in the moment. It’s not about pushing yourself into a deep backbend, but rather about finding an open, expansive sensation in your body that is both nourishing and calming.
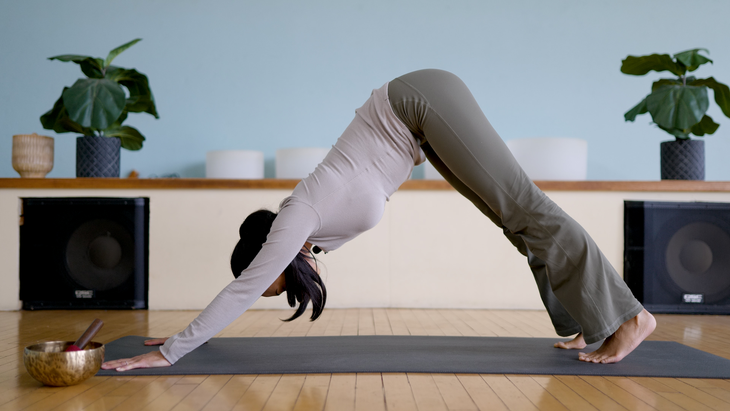
Downward-Facing Dog (Adho Mukha Svanasana)
Begin by lying flat on your mat, face down, with your legs extended and your arms resting by your sides. Inhale deeply, and as you do, slowly lift yourself up, coming into a tabletop position with your hands directly beneath your shoulders and your knees beneath your hips. Tuck your back toes under and press into your palms as you prepare to move into Downward-Facing Dog (Adho Mukha Svanasana).
As you exhale, begin to lift your hips toward the sky, creating an inverted V-shape with your body. Focus on the alignment of your hips and legs as they reach toward the ceiling. Imagine that your hips are being lifted by an invisible string, drawing them high and away from the floor. At the same time, work to straighten your arms and engage your core to stabilize the pose.
You don’t need to worry about getting your heels to touch the mat immediately—this pose is about creating length along the back of your legs and spine. If your heels don’t reach the mat, that’s perfectly fine. Instead, focus on lengthening the back of each leg. To do this, you can gently walk your dog by bending one knee at a time, allowing the opposite heel to reach closer to the mat. This dynamic movement helps release tension in the calves and hamstrings while still working to open up the legs and stretch through the back.
Another option for deepening the stretch is to gently bend one knee at a time while reaching the opposite heel toward the mat. This will allow you to focus on lengthening each leg individually and finding more space in your body.
As you hold Downward-Facing Dog, allow your head and neck to relax between your arms. Your gaze can be directed at your knees, your belly button, or even between your legs. Keep your breath steady and calm, using it to create space in the body.
Stay in Downward-Facing Dog for at least 5 full cycles of breath, feeling the stretch deepen with each exhale and the energy move through your body with each inhale. As your body becomes accustomed to the pose, you may choose to stay for longer if you are practicing a longer yoga flow, holding the pose for up to 20 minutes or more, depending on your comfort level.
Remember, the key in Downward-Facing Dog is to focus on creating length and space in your body rather than forcing your heels to the mat. Allow yourself to be in the present moment, breathing deeply and allowing your body to gently open and release. If you need to take a break, feel free to come back to a resting position like Child’s Pose (Balasana) and then return to Downward-Facing Dog when you’re ready.
As you continue to practice, you’ll notice your flexibility and strength improve, and Downward-Facing Dog will become a natural and comfortable pose in your yoga flow.
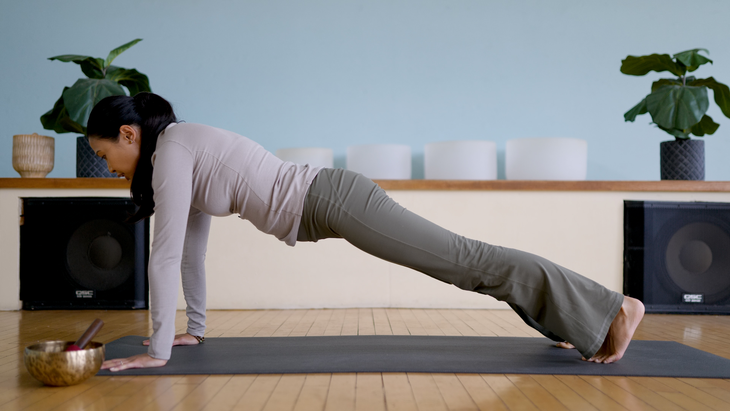
Plank
On your next inhale, shift forward to your Plank Pose (Phalakasana). Exhale press down the hands firmly and remove any spaces between the hands and the surface of the mat. Inhale shoot the crown of the head toward the front.
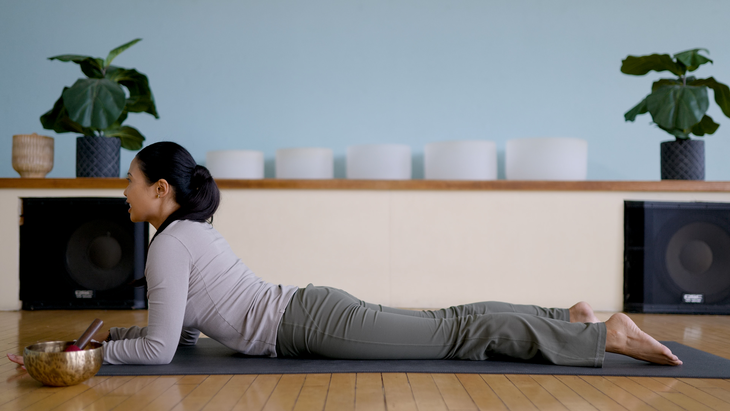
Sphinx
As you exhale, lower your knees to the mat, untuck your back toes, bend your elbows, and hug them in toward your ribs as you lower all the way down onto your belly. Come onto your elbows as you inhale and lift your chest in Sphinx Pose (Salamba Bhujangasana).
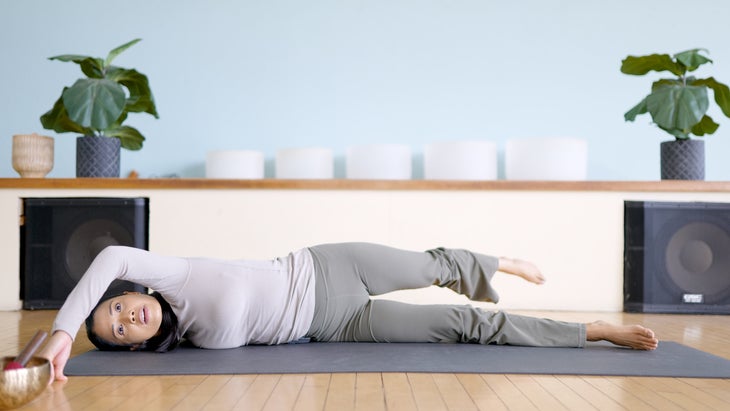
Scorpion Twist
Sphinx Pose Flow with Leg Extensions and Shoulder Opening
Start by lying flat on your belly with your legs extended straight behind you and your feet hip-width apart. Prop yourself up on your forearms, ensuring that your elbows are directly beneath your shoulders. Your chest is lifted, and you feel a gentle backbend as your heart opens in Sphinx Pose. Take a few deep breaths here, grounding through your forearms and creating length through your spine.
From here, slowly lower your forehead down to rest on your stacked hands, creating a comfortable position for your head. Once your forehead is resting on your hands, inhale deeply and as you exhale, begin to move your legs gently side to side, windshield-wiping them from left to right. This movement helps release any tension in your lower back and hips, allowing for more freedom in the body as you continue.
Now, as you inhale, begin to lift your head just an inch or two off the mat, coming back to a neutral position. Cactus your arms by bending your elbows at roughly 90-degree angles, opening your chest even further. Keep your arms strong as if you’re making the shape of a goalpost, feeling the stretch across your shoulders and chest.
Bring your feet together, letting your big toes gently touch. As you plant your right palm down on the mat, come onto your left fingertips, pressing down lightly to stabilize your body. With a slow and controlled inhale, lift your left leg off the mat. As you exhale, step your left foot behind you, either bringing it to the floor or keeping it hovering slightly above the mat. If your foot is hovering, ensure that you maintain your balance while keeping your inner right shoulder pressed down toward the mat. You should feel your right thigh rolling gently toward the right side of the mat, creating a stretch along your hip flexors and thighs.
Take 3 to 5 cycles of breath here, allowing your body to open with each inhale and deepen the stretch with each exhale. Let the movement flow naturally with your breath, finding stability and strength as you hold the position.
On your next exhale, bring your left foot back to center, and gently come back to the starting position. Place your left palm down on the mat and bring your feet together again. Now, shift onto your right fingertips, planting your left hand firmly on the mat for stability. Inhale deeply, and as you exhale, lift your right leg, drawing it behind you. You can either place your right foot on the floor or keep it hovering slightly above the mat.
This time, you should feel the left thigh rolling toward the left side of the mat as your body opens up. Take another 3 to 5 cycles of breath, staying connected to the movement and flow of your body. Use your breath to deepen the stretch and maintain balance in the pose.
After your last exhale, gently lower your right leg back to the mat and come back to the center. Bring your feet together, rest your forehead back on your stacked hands, and take a few deep breaths to let your body settle and release any tension.
This flowing sequence helps to open up the chest, shoulders, and hips while also engaging and strengthening the legs. It’s a great way to build strength and flexibility, especially in the hip flexors, thighs, and shoulders. With each round, the body becomes more aligned, and the breath more steady, allowing for deeper relaxation and stretch..
Thread the Needle Pose
Start in a tabletop position, with your hands aligned directly beneath your shoulders and your knees under your hips. Inhale deeply, and as you exhale, empty your lungs completely.
Now, on your next inhale, reach your left arm toward the ceiling, twisting gently through your torso. Exhale, and thread your left arm underneath your right arm, bringing the outer part of your left shoulder to the mat. This creates a gentle stretch in the upper back, shoulders, and arms. As you inhale, stretch your right fingertips toward the top of the mat, and as you exhale, press a little more into the outer left shoulder to deepen the stretch.
If you’re looking to deepen the stretch, you can lift your right foot, bringing it across your body toward the right side of the mat, keeping it at hip height. This will add more pressure on the outer left shoulder, helping to open up the shoulder and stretch deeper into the back.
Stay here and focus on your breath, allowing the body to relax into the stretch. Continue to breathe deeply and stay for 3 to 5 full cycles of breath, feeling the length and stretch along your shoulders, neck, and back.
After your final exhale, gently plant your right palm back down to the mat, and inhale as you lift your body back into a tabletop position. Exhale completely, and prepare to switch sides.
Now, repeat the same process on the other side: inhale as you lift your right arm toward the ceiling in a twist, then exhale and thread your right arm under your left, bringing the outer right shoulder to the mat. Reach your left fingertips toward the top of the mat, and if desired, add more pressure on the outer right shoulder by bringing your left foot across toward the left side of the mat at hip height. Hold for 3 to 5 cycles of breath before returning to tabletop.
Take your time with this pose, allowing your body to relax and deepen with each breath, feeling the gentle release through your back and shoulders.
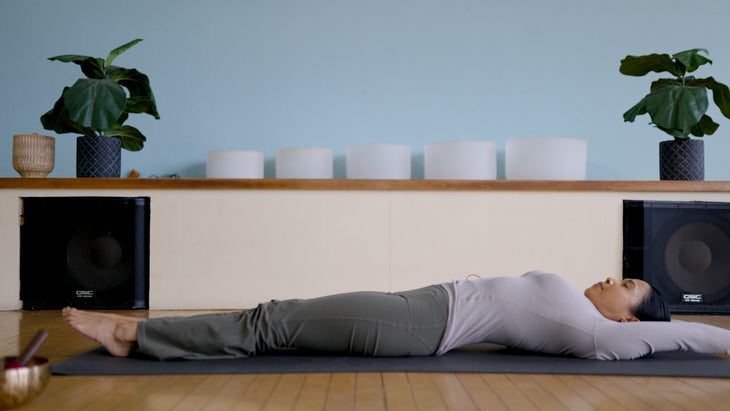
Morning Stretch
Start by swinging your legs in front of you, so you can come to a seated position, and then slowly lie down on your back. Inhale, and as you do, stretch your legs out long and reach your arms overhead, lengthening your body from your fingertips to your toes. Imagine stretching in opposite directions, creating space along your spine.
Now, exhale and bring your knees toward your chest, curling your body as you bring your forehead toward your knees. As you lift your shoulders off the mat, hug your knees in even tighter. Repeat this movement 3 times. On each inhale, focus on lengthening your body from your fingertips all the way to your toes. On each exhale, curl your body further, bringing your forehead closer to your knees as you pull your knees in.
This gentle stretch helps to energize and awaken your body, and the rhythm of your breath will allow you to feel more grounded and stretched.
Reclined Twist (Supta Matsyendrasana)
Start by bringing the soles of your feet back to the mat, keeping them together. Slowly lower your knees over to the left side, making sure they stay stacked. Extend your right arm out to the side in a T-position, or you can bend your elbow into a cactus position. If it feels comfortable for your neck, you can turn your head to look over your right shoulder, or you can simply close your eyes and relax into the stretch.
This is your Supine Twist, a great way to release tension in the spine and stretch the chest. If you prefer, you can close your eyes to deepen your connection with your body and your breath, allowing the sensations of the twist to become more pronounced. With each inhale, feel your body lengthen, and with each exhale, allow yourself to relax deeper into the twist. Hold here for 3 to 5 cycles of breath or, if you’re practicing a longer yoga flow, feel free to stay for as long as you need to fully release the tension.
After your last exhale, inhale and slowly bring your knees back to center. On your next exhale, lower your knees to the right side, repeating the stretch on this side. Again, hold for 3 to 5 cycles of breath, letting your body soften into the stretch, and allowing your breath to guide you deeper into relaxation.
This gentle twist helps release stiffness in the spine, hips, and shoulders while also calming the nervous system.
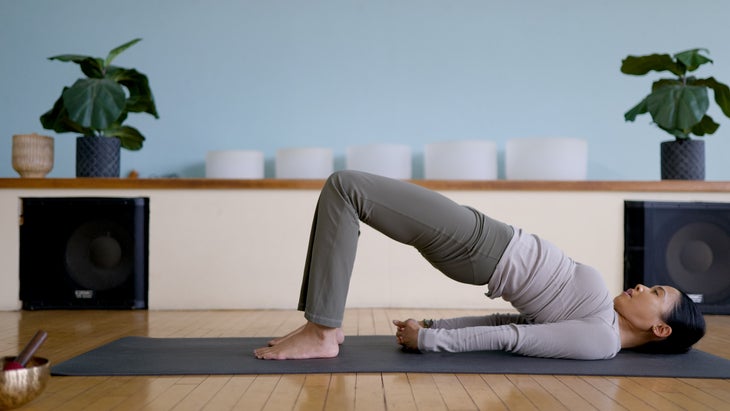
Bridge Pose (Setu Bandha Sarvangasana)
Start by bringing your knees back to center as you inhale, and as you exhale, place your feet firmly on the mat with your arms relaxed by your sides. On your next inhale, lift your hips up toward the sky, coming into Bridge Pose.
If you’d like to deepen the stretch, you can interlace your hands underneath you, tucking your shoulders beneath your body for added support. Inhale again, lifting your hips higher, pressing down through your heels to engage your glutes and legs. Hold the pose for at least two full breaths, keeping the hips lifted and engaging the entire body.
When you’re ready to come out of the pose, exhale and release your hands. Slowly lower your spine down to the mat, one vertebra at a time, starting from your upper back and rolling all the way down to your lower back. Take your time with the descent, feeling each vertebra make contact with the mat as you return to the ground. You can also count down as you lower yourself: 3, 2, and 1.
Bridge Pose helps strengthen the back, glutes, and legs while also opening the chest and improving spinal flexibility. It’s a great way to counteract sitting and help relieve tension in the lower back.
Reclined Figure 4
Start by bringing your feet together. Inhale and lift your right foot off the mat, then cross your right ankle over your left knee, creating a figure 4 with your legs. To deepen the stretch in your right hip, you can gently press your right thigh with your right hand, encouraging the hip to open. If you’d like to feel a deeper stretch, you can lift your left foot off the mat, interlace your hands behind your left hamstring or reach for your shin, and gently pull that leg closer toward your body.
Stay in this position for at least 5 cycles of breath, or longer if you feel comfortable, focusing on relaxing into the stretch and releasing any tension in your hips.
Once you’re ready to move on, release both feet back down to the mat. Take a moment to relax, then repeat the stretch on the other side. Cross your left ankle over your right knee and follow the same steps to stretch the left hip. Hold for 5 cycles of breath, and enjoy the deep release in your hips and legs.
Reclined Figure 4 is a great way to open the hips and stretch the glutes, helping to relieve tension and improve flexibility.
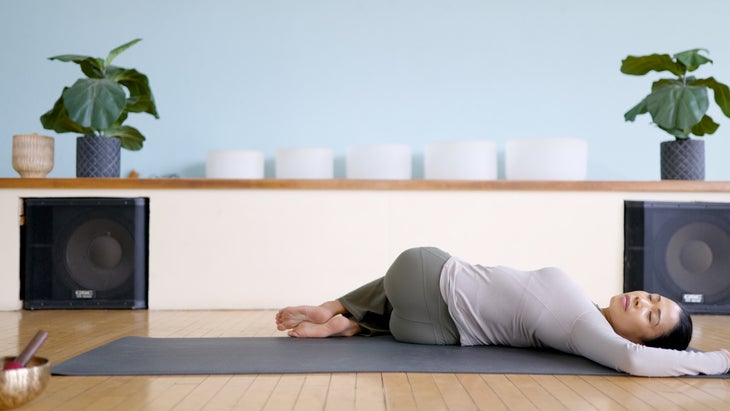
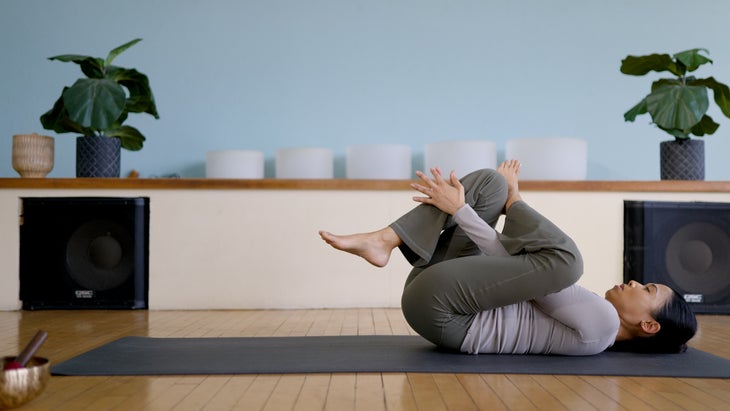
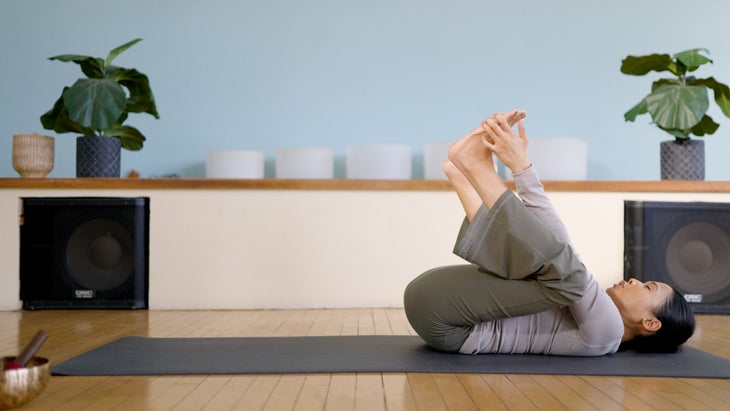
Happy Baby (Ananda Balasana)
Start by releasing both of your feet back to the mat. Inhale and lift your legs straight up toward the sky, pointing and flexing your toes to create some movement in your ankles.
On your next exhale, bend your knees and grab hold of the inside or outside of your feet or ankles. This is Happy Baby pose. As you hold your feet, bring your legs and feet closer to your body, keeping your lower back, shoulders, and head gently pressed against the mat.
If you’d like to deepen the stretch and release tension in your lower back, you can sway gently from side to side, massaging your back against the floor. Take a few moments to breathe deeply and relax into the stretch, feeling the opening in your hips and the soothing release in your back.
Happy Baby is a great way to release tension in your hips and lower back while also stretching the inner thighs. Enjoy the playful and calming nature of this pose as you hold and breathe deeply.
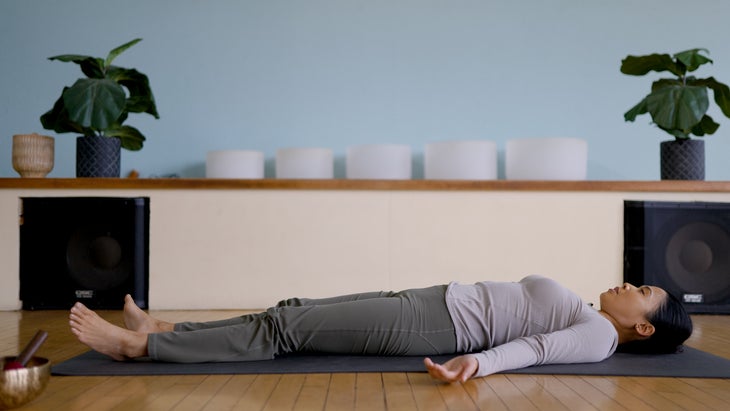
Savasana
To prepare for your final resting pose, Savasana, extend both legs long toward the top of the mat. Let your arms rest by your sides, palms facing up. Take a moment to settle into the mat and find comfort in this peaceful position.
Before fully relaxing, let’s take 3 cleansing breaths: inhale deeply through your nose, and then exhale through your mouth. Do that two more times: inhale through the nose, and exhale with an open mouth. One last time, inhale through the nose, and exhale, letting go of any remaining tension.
Now, let yourself settle into Savasana. Stay here for as long as you’d like after your yoga flow, allowing the peace and stillness to fill your body and mind. This is your time to completely relax, absorb the benefits of your practice, and bring calm to your day.